THE ST. LOUIS VERTICAL
By Dave Gauding,
NF0R
The St. Louis Vertical (SLV) offers portable enthusiasts an
easy-to-build, easy-to-use antenna which:
- Covers 10-40M via a balanced line tuner
(Lots of Bands for the
Bucks)
- Installs independently of external supports
(Trees are not required)
- Is inexpensive
(About $40)
- Is lightweight
(45 oz. for antenna, mount and radials)
- Is really portable
(Car, canoe, backpack, bike, etc.)
- Installs pronto
(5 minutes or so)
Materials:
- 20' Collapsible Fiberglass fishing Pole
SouthBend Model SD-20
- 12" of 1/25" Hardwood Dowel
- 10" Heavy duty Gutter Spike
- Vinyl Plastic Electrical Tape
- 5 Small Alligator Clips
- 1 Small Solder Lug
- 1 Small Hollow rubber Ball
- 1 Medium Fishing Swivel
- 12" Light Monofilament Fishing Line
- 10" #8 Bare Copper Wire
- 300 ohm In-line Plug and Socket Set
(RS15-1198)
- 130' of 300 Ohm Twinlead (RS 15-004)
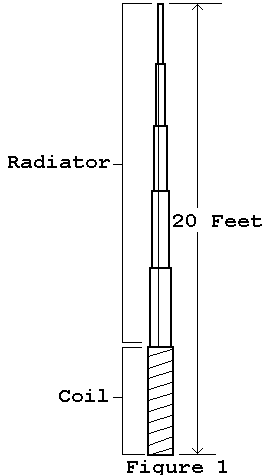
How It Works
About 51' of twinlead is coiled on the
4' bottom section of a 20" collapsible fiberglass fishing pole. An additional
16' of twinlead in the clear serves as a vertical radiator. See Figure 1.
The pole is socketed on a wooden hardwood dowel tipped with a pointed
spike. It can be pressed into firm ground by hand in practically any location.
Due to the light weight construction and minimal sail area the installed antenna
is very stable.
Shortened twinlead radials are used in this design. The
smaller footprint can be helpful at some locations. Three radials work okay for
casual operations. The number of radials can be increased or otherwise modified
to meet builder preferences. See Figure 2.
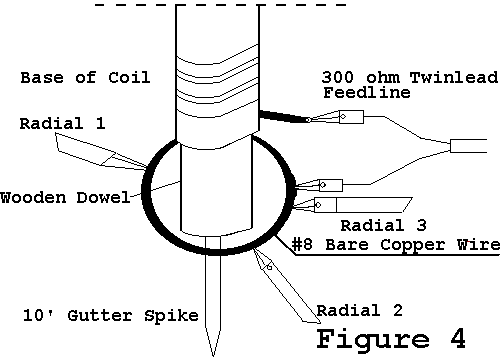
The ground bus is a circle of
bare copper wire. The antenna radials and feedline are attached with alligator
clips. See Figure 3.
The SLV's tuned feedline provides a seven band
capability. Choose any balanced feedline such as twinlead, window line, zip
cord, twinax. etc. Impedance and length are noncritical. Selecting a St. Louis
Tuner is politically correct but similar transmatches work just fine, of course.
CONSTRUCTION
1.
Terminate a balanced feedline in alligator clips and solder.
2. Cut
three 20' lengths of twinlead for the radials. Short and solder each radial at
one end. Then short and solder both conductors to an alligator clip at the
opposite end. Measure out 6.5' from the alligator clip. Remove a 1" section on
one side of the conductor only. When you do this, use a pair of side cutters and
just barely cut the wire. Then, using a pair of needlenose pliers, pull out the
1" section, doing as little damage as possible to the insulation, as you want to
leave it for strength. Protect the cut with tape. this creates a continuous
33.5' folded ground wire and a 6.5' ground wire in a 20'span. The long dimension
acknowledges the lowest design frequency (40M). See Figure 2.
 3. Form the bare
copper wire into a circle to create the ground bus wire and solder.
3. Form the bare
copper wire into a circle to create the ground bus wire and solder.
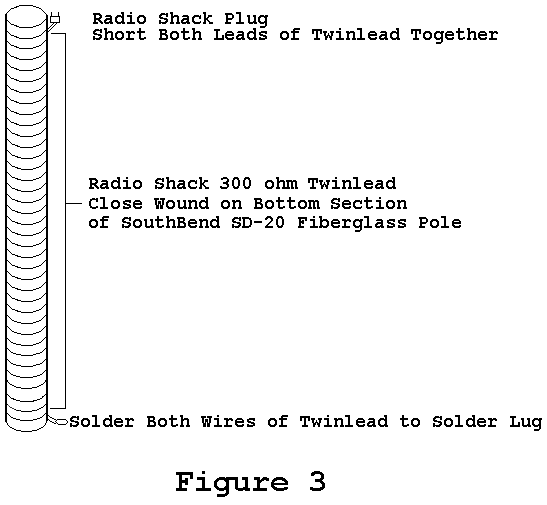
4.
Using twinlead for the loading coil, strip and short the wires and terminate in
a solder lug at the bottom of the coil. The top of the coil will be finished
later. The twinlead may be spliced and soldered if a continuous length is not
available.
5. Position the solder lug end of the twinlead at the top
edge of the pole's protective base. Tape in place or use a wire wrap, but leave
2 or 3 inches of the twinlead for the solder lug to flex. If right handed, start
the coil by rolling the pole away with the right hand. Feed the twinlead onto
the pole with the left hand. Butt each turn neatly against the preceding turn.
The rolling action extablishes a fairly shallow placement angle. Positioning the
far end of the pole at table level between two heavy objects (i.e. gellcell
batteries) helps control the assembly while winding progresses.
6.This
is surprisingly strenuous hand work when executed properly. Proceed slowly and
take occassional breaks. The twinlead needs to be wrapped firmly but not too
tightly. The Radio Shack product was selected because the brown rubber jacket
and #24 stranded conductors are very pliable. In addition to being relatively
light this twinlead does not easily take a set if bent.
7. With the
SouthBend pole and Radio Shack twinlead in combination there will be about 142
turns on the base section when the loading coil is finished.
8. Tape the
top end of the completed coil in place leaving two inches free for connections.
Reinforce both the top and bottom turns with additional tape or use a small
nylon wire tie and cover with tape. The entire coil can be wrapped in tape for
complete protection.
9. Strip the wire and install the 300 ohm in-line
socket at the top of the end of the loading coil, making sure that you short the
two leads together. For durability the wire conductors should be folded back
upon themselves several times and twisted before tinning. Miniature solder cups
are another alternative. Fix the terminal screws in place with Loctite or clear
nail polish. Note that an unbroken twinlead coil and radiator is also an option,
as is terminating the top of the coil with an Alligator clip and using it to
connect to a single radiator wire. See Figure 3.
![]() W6MMA Vern Wright's SLV with clip lead rather than plug
W6MMA Vern Wright's SLV with clip lead rather than plug
10. Fully extend the pole along the ground. From the tip of the
loading coil will measure about 16'. Cut a matching length of twinlead for the
radiator.
11. Install the 300 ohm in-line plug on the lower end of the
radiator. Plug into the previously installed coil jack. Trim the radiator to
about 4" below the top, short the wires and solder. Add 5" of monofilament to
the tip section and finish with the swivel. This system is preferable to direct
attachment where the angle tends to ben the pole over at the tip.
12.
Tape or shrink wrap each soldered joint on the loading coil, radiator, radials
and feedline.
13. Cut the head off the nail. Drill out the dowel to
accept it an tap firmly into place. Make a slit in the rubber ball and install
on the spike for safety. Each fiberglass pole is laid up by hand and internal
diameters will vary. Some light sanding on the dowel may be necessary to insure
a good fit or add a tape wrap if undersized.
Installation
1. Push the spiked dowel into firm
earth by hand. Drop the ground wire bus over the dowel. For now, extend only the
smallest diameter pole section and twist into position.
2. Unscrew the
pole's bottom cover plate while holding the individual sections inside.
Carefully slip the entire nested assembly over the dowel.
3. Attach the
radiator to the tip section with the swivel. Start extending sections
sequentially to 20' locking firmly into place at each level. Plug the radiator
into the coil.
4. Attach the radials to the ground bus. Attach the
feedline to the radiator and to any point on the ground bus. See Firgure 4.
![]() W6MMA Vern Wright's SLV
Notice heat shrink tubing rather than electrical tape on coil
W6MMA Vern Wright's SLV
Notice heat shrink tubing rather than electrical tape on coil
Comments
Tuning is very
sharp. Depending on the tuner expect to spend some time in locating resonant
points for each band. On the plus side the bandwidth is surprisingly generous
including 40M. With a quarter wave of electrical length available the SLV will
load on 80M but has not been used seriously on that band.
The dimensions
were truly created at random but appear to fit this 10-40M application. Shorting
the twinlead probably offers some electrical benefits but is done mainly for
mechanical reasons.
Builders will be able to get by with as little as
20-25' in the coil if necessary. A simple 16' stranded wire can replace the
twinlead radiator. There is plenty of room for experimentation such as single
band verticals using coax feedline. The SLV has handled 50W with no coil heating
detected.
The specified Radio Shack twinlead is a light duty product. If
weight is not a problem users may want to upgrade to a heavy duty twinlead.
The wood dowel should fit snugly in the base section to provide rigidity
for the installation. However, the dowel may swell if exposed to moisture.
Waterproofing with a coat of varnish is suggested for wet climates.
Initial reaction to the pole's light fiberglass construction and
flexibility is predictably skeptical. For the record the South Bend SD-20 pole
is the SLV prototype has been used as a portable antenna support for eight
years.
Backpackers and hikers can rig a simple leather sling for a SLV
and shoulder it like a rifle. It is marginal as walking stick. The nexted
fiberglass tubes tend to rattle and plastic screw cap on the base is prone to
damage on rocky ground.
The SLV is useful for clandestine operating
around condos or apartments. The tapered profile and black finish are
understandably difficult to detect at night. The antenna can practically be
erected by feel in a pinch.
This little antenna follows little QRP rigs
almost anywhere. Once there, a SLV offers an opportunity to get our low power
tranceivers on the air with a respectable signal.
Finally, a not
unexpected reminder that if the bands are dead the fish might be biting. Either
way a SLV operator is properly equipped. Good luch and be sure to pass along any
modifications to the original design.
72, Dave, NF0R
This article is posted from the August 1996 Peanut Whistle, Journal
of the St. Louis QRP Society republished in September QRPp and may only be
reproduced by newsletters of Ham radio clubs with appropriate credit noticed.