
HF Digital Messaging - Emergency / Disaster Relief - Interoperative Communications - Ham Radio


|
Getting Started: Using and Configuring PCALE for Ham Radio ALE Download PCALE click here Download QRG channel files here QUICK START GUIDE Some notes, diagrams, and information for getting started with PCALE in ham radio. Your display may look slightly different from the images shown, because PCALE is often updated with new or changed features. A view of the PCALE main control panel: 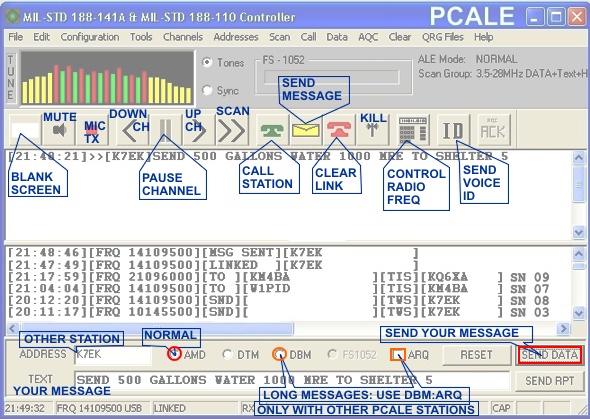 |
| INSTALL SOFTWARE PROCEDURE IMPORTANT 1. Make a new folder (directory) in your computer drive C:\ 2. Name the folder PCALE 3. The path of the new folder will be C:\PCALE 4. Install all the PCALE software in this folder. 5. Do not let windows install automatically into another folder. |
| SHORTCUT Set Up NOTE: For Windows 7, Windows 8, Vista, or XP using desktop shortcut or Start menu. 1. Right Click on the PC-ALE Desktop shortcut. 2. Select the Shortcut Tab 3. Edit "Start in:" to match the folder path where you installed PCALE 4. Apply. 5. OK.  |
Load the QRG file (see diagram below). QRG Files>Load QRG File Browse, find, and double-click on the QRG file you downloaded.  |
Load your callsign (see diagram below). PCALE>Addresses>Modify>Own>Select Address>Modify Own Address Follow these steps VERY CAREFULLY to enter your Own Callsign (Own Address). 1. PCALE, at the top: ADDRESSES>MODIFY>OWN>Select Address>NOCALSIGN>OK 2. Double-click on NOCALSIGN. 3. NOCALSIGN should now be highlighted. 4. Type in your own callsign. Press OK.  |
Check Your Callsign (see diagram below) PCALE>Addresses>List>Own 1. View the list, it should have your callsign in the OO line. 2. If this fails, repeat procedure starting at Step #1 of Load Your Callsign. 3. If this succeeds, you are ready for channel scan group selection.  |
Select your Active Channel Scan Group. (see diagram below) . Set the channel groups to the frequencies you wish to scan and transmit on. These channel groups have pre-programmed frequencies in the QRG file for your geographic area, region, or country. Select an active channel scan group for testing (see diagram below): Put your transceiver VFO on 14109.0kHz USB in the 20 meter ham band, and connect a 14MHz antenna or dummy load to it. Check the SWR before going any further! Select the Active Channel Scan Group to operate: Channels>Select Active Group>14MHzVOICE+DATA>OK This will select your system to scan and transmit only on the 14MHz ALE channels. Other channel scan groups may be selected in a similar way, but for intitial testing, use the 14MHz scan group.  |
Set the MIL-STD 188-141 Options (see diagram below). PCALE>Configuration>MIL-STD 188-141 Set your parameters as in the diagram below. Set your Radio Type. In the lower right part of the control panel, select the computer ports that your computer uses for CAT and PTT. Connect your radio to your computer via CAT serial interface port.  Configure your Radio Type for CAT and PTT control (see diagram below).  Enabling CAT Control Inside Your Transceiver's menu: After configuration of PCALE radio type, then check your transceiver's menu settings to sure CAT control is enabled, has the manufacturer's default bus (hex) address, and suggested baud rate. Connect the CAT serial data cable and any other interface devices needed for your radio. |
Audible Alarms, Scanning, and Calling set up: PCALE>CONFIGURATION>PROPERTIES (see diagram below) Set your Alarms. PC Speaker will beep when you receive an ALE call or message. Set your Scanning Section. This limits the duration of your calling transmissions. Use minimum 6 and maximum 10. Set your Calling number of attempts. Use 4 attempts on best channel. Use 1 Attempt on all channels.  |
CAT control of the radio: CAT (Computer Aided Transceive) is the method of controlling your transceiver's frequency and mode by computer, via the serial port. PCALE uses CAT to scan and control the ALE channel frequencies. For CAT to function properly, the transceiver must be connected to the computer's serial port, the computer must be set up to the proper com port, and the radio must be enabled for CAT and set up to "talk" with the computer using the correct Hex Address and Data Speed (baud). PCALE has all the correct parameters for CAT for your radio built in to the program. When you selected and set up the Radio Type in the Configuration MIL-STD 188-141A options, it uses the default parameters appropriate for interfacing CAT with your radio. Note: If your radio is using a non-standard address (such as ICOM radios which the user may change hex address), then you can change PCALE address and baud rate to match this in the Radio Port configuration, for custom settings. For help with custom radio port settings, or other problems with CAT control, please ask questions on the HFLINK group. After you have set up your CAT system correctly, you can check the function of the CAT system using the following method. Check the CAT control function: 1. In PCALE, press the [ > ] button, and press it again until the frequency display at the bottom of the PCALE window shows FRQ 14109000. 2. Verify that your transceiver display frequency changes frequency with the software frequency. Select an Active Channel Scan Group for ALE operation: CHANNEL>SELECT ACTIVE GROUP> (select your desired scan group) >OK Step through each channel to verify your selection: Press the right button [ > ] button. Press it again for each channel until you have verified all channels are proper for your operator license, your transmitter, and your antenna system. Verify your antenna system SWR is good on all frequencies you select! Send a test transmission. Adjust transmit audio drive level. 1. Select a channel for the test. Listen. 2. Press the [GREEN TELEPHONE] button 3. Select @@@ 4. Select TIS 5. Press OK. Your system will transmit a test call. 6. Watch your transmitter power output during the test call. 7. Verify that your ALE test transmission is sent, with proper transmit level. 8. Adjust the transmit audio drive to the proper level. An average-reading power output meter should show about 50% of normal maximum power level. A peak-reading meter should show about 75% to 100% of normal maximum power level. 9. You should see a line in the display indicating [FAILED ] . This is normal, it means you have failed to link with another station. |
How to call a specific station (see diagram below): To call another ALE station, with an INDIVIDUAL CALL on a specific channel. 1. Press the [ || ] button to stop scan. 2. Press the [ > ] button several times, to select the specific channel for your call. 3. Listen on the channel. 4. Press the Green Telephone button 5. Bring up their callsign in the pull-down box. 6. Press the OK button. PCALE will transmit the call on this channel. If you see a line in the display indicating [FAILED ] . This is normal, it means you have failed to link with another station. Note about Scanning Call: To send a scanning call, be sure your desired Channel Scan Group is already selected and checked for SWR, then start scanning with the [ >> ] button. While scanning, use the Green Telephone button to call a station. The call will be transmitted on every ALE channel in your active Channel Scan Group.  |
How to make a Call to a group of stations: Transmit a NETCALL (see diagram below). The best way to start connecting with other ALE stations, is to transmit a few scanning calls using the NETCALL function. The stations of the Global ALE High Frequency Network are on the air 24/7, so this provides you with a good starting point for both receiving ALE stations, and connecting with one. The net name for it is HFN if you make a NETCALL to the HFN net, all stations who are part of this net within range will respond and link with you. First, stop scanning [ || ] and select an ALE channel using the [>] button. For USA, try an HFN netcall on one of the following frequencies: 3596.0 - 7102.0 - 10145.5 - 14109.0 - 18106.0 - 28146.0 (kHz USB) In Europe and some other regions of the world, two additional frequencies are used : 3617.0 - 7040.5 (kHz USB) 1. Press CALL>NET>Select HFN from the dropdown list >OK Your transceiver will automatically transmit a Netcall on every channel in your active Channel Group. 2. Wait 1 minute after the transmission for automatic reply from other stations. Any other ALE station within propagation range will link with you, and you will see the station's callsign "linked" in the main window of PCALE. 3. If you link with another ALE station, PCALE will show a yellow color envelope button, and it will display the callsigns of any stations you are linked with. If you are linked on a voice channel, simply start talking on the microphone in Upper Sideband with the other operator. 4. If you do not link with any station, PCALE will display a "Failed" message. If you see a line in the display indicating [FAILED ] . This is normal, it means you have failed to link with another station. Note about Scanning Netcall: A scanning netcall will call on every ALE channel in your currently selected scan group. To send a scanning netcall, set your desired active Channel Scan Group, start scanning with the [>>] button, then while your transceiver is scanning: Press CALL>NET>Select HFN from the dropdown list >OK Your transceiver will automatically transmit a Netcall on every channel in your active Channel Group. It will wait about one minute for replies after calling on each channel before it steps to the next channel and tries there. If any station replies, it will stay on that channel and link you up with the station.  |
Ready to scan and sound! Press the scan button [ >> ] on the PCALE screen. Your radio should now be scanning the channels. Your radio will transmit soundings (station ID) every hour only on the ALE Pilot Channels of the scan group you have selected. Responding to calls: Your ALE system will automatically respond to other stations calling your callsign. PCALE will show LINKED WITH [callsign] whenever a station links with you. If you are using a desktop PC with internal speaker, the speaker will ring like a telephone. If you are linked on a Data Channel, you can send or receive text messages with the other station, or change to any mode you like for the QSO. If the response is successful, you will be LINKED. The Yellow Envelope and Red Telephone appear as you link. You may then use the Yellow Envelope to send short text messages using AMD (tick the TIS check box). If you are linked on a Voice Channel, you can simply pick up the microphone and start talking, using Upper Sideband voice. Responding to Netcalls: PCALE is programmed by your QRG file to automatically respond to Netcalls for Nets that you are member of. You may also add new nets using the Address>Add>Net menu. Normally, PCALE always responds to the following nets: HFL QRZ HFN GPR RPT Initiating a QSO with an AMD text message: In ALE, the universal short text message format is called AMD. After you are linked with another station on a data channel, you may send and receive AMD messages. If you see a line in the display indicating [FAILED ] . It means you have failed to completely link with the other station. Simply send your message again. Normally, the first AMD you send should be to negotiate the mode of QSO or QSY with the other operator. Keep the first message short, a few words such as: NAME QTH PCALE Signal reports are not necessary in ALE. Send an AMD text message: 1. Link with another station. 2. Click on the yellow envelope. 3. Enter your message in the text box. Click OK. 4. The message will now be sent. If it has been received by the other station, you will see "message sent" on the screen. 5. If the message failed to get through the noise, you will see a "No Handshake" or "Failed" message on the screen. 6. Try sending the AMD again. 7. When your AMD QSO is complete, press the Red Telephone button>OK. It will send the CLEAR LINK signal to the other station, and both ALE systems will automatically start scanning again. Scan and transmit soundings on the 14MHz ham band: 1. Select the 14MHz Active Channel Scan Group. 2. Press the double right arrow [ >> ] button. 3. This will start it scanning the 14MHz channels, and it will send repetitive soundings every hour on 14109.0 kHz, and automatically respond to calls. 4. To stop scanning, press the [ || ] button. How to QSO by text via AMD: AMD is the "universal" text message method you can use to exchange text with any other ALE station while you are LINKED. 1. Link with a station. 2. Enter the other station's callsign in the bottom window's ADDRESS box. 3. Enter your message text, then select AMD and press the SEND DATA button. 4. The top window displays messages between you and the other station you are linked with. How to QSO by text via DBM ARQ: DBM ARQ is the robust message method you can use to exchange text or data with other stations who are using PCALE software. If the other station is using PCALE, you can select DBM and ARQ, which helps the text message get through noise better. PCALE Middle Display Window: The middle window displays your links and soundings from other stations with time and frequency stamp. It also can display other raw decoded commands and ALE data when the Tools>TRACE RX is selected. Don't use the TRACE RX all the time... it will eventually cause PCALE to fail from too much data input, and you will need to re-start the program. Here are some of the notations displayed by PCALE in the Middle Window: FRQ= Frequency in Hertz. SND=Sounding received TWS=This Was (ham radio uses "This Was" soundings) TIS=This Is (similar to the use of DE in a ham CW QSO) AL0=Not Encrypted (AL1=encrypted) BER=Digital Bit Error Rate: BER 30=Excellent Quality | BER 25 = Good Quality | BER <20=Poor Quality SN=RF Signal/Noise Condition: SN >08=Very Clear | SN 05=Clear | <SN 03=Noisy AMD= Universal ALE Text Message DBM= Message or file sent by PCALE station, usually ARQ. GPR=Geo Position Report: OBJECT(callsign) * LATITUDE * LONGITUDE * ALTITUDE * DATE-TIME * COMMENT GPR uses Latitude and Longitude reported in decimal degrees. PCALE Upper Display Window: The upper window shows messages to and from your station. Messages show in this window whenever a station links with you. Any station may call you when you are away, and leave you a text message in the upper window. Check your messages by scrolling with your mouse. Whenever you are in a texting QSO with another station, the messages will appear in the top window. PCALE Lower Text Input Window: The lower text input window is convenient for texting QSOs. 1. After linking with a station, enter their callsign in the ADDRESS box. 2. Input the text you wish to send to the other station. 3. Select AMD. 4. Press the SEND DATA button. 5. Your text will be transmitted. In the lower text input window, you may also select DBM with ARQ when you are linked with another PCALE station. DBM with ARQ is a more robust method of sending and receiving text or data. It is highly recommended. Keep in mind that there are many other types of ALE stations on the air, not all of them use PCALE. If you don't know what type of ALE station you are linked with, it is best to use only AMD. You may also request or ask the other station's operator if they would like to use another mode, such as PSK31, Olivia, or SSB voice. The RESET Button The RESET button in the lower window may be used to reset the modem if there is a glitch. One way to tell if the modem must be reset, is to watch the Yellow Envelope. If it disappears for a long period of time while no one is sending, and you are still linked, then you should press the RESET button. Red Telephone: Use the Red Telephone to clear the link when you are done with the QSO. This is especially important when connecting with HFN Pilot Stations. More information: The message archive of the HFLINK group may be used to search for information needed about ALE and PCALE operation: http://tech.groups.yahoo.com/group/hflink/msearch_adv Solutions to common problems: |
| Common Problem: Cannot Load the QRG File The symptom of this problem is: When using the QRG>Load QRG File menu, the QRG file does not appear in the window of available files, even when the file has been downloaded properly and the correct folder is selected. The cause of this problem is: Windows, Notepad, or other Microsoft programs sometimes cause files to be invisible, or change the "file.extension" of the file to ".txt". The solution to this problem is: 1. In Windows "My Computer", go to the PCALE folder that contains the QRG file. 2. Use the Tools>FolderOptions>View menu. 3. Un-check (un-tick) the "Hide extensidons for known file types". Apply. OK. 4. View the QRG file. 5. Right-click on the QRG file. 6. Rename it from file extension ".qrg.txt" to simply ".qrg" 7. Accept any "warnings" from Windows. 8. The file will now be recognized by PCALE as a QRG file.  |
Other helpful information: PCALE Help file (obsolete but useful as a reference) This file may be saved into your PCALE folder. It will be displayed when you press the Help menu in PCALE. PCALE computer to transceiver interface information for CAT and PTT More information about how various transceivers are configured for CAT and PTT interfacing via serial ports. PCALE Installation errors Errors encountered during the first boot of PCALE after installing it, such as: "Cannot Create Radio Control Object" etc. These are often due to missing files in your Windows version. |
END OF PAGE
©2000, 2001, 2002, 2003, 2004, 2005, 2006, 2007, 2008 HFLINK, div of HFpack Inc. All Rights Reserved.
HFLINK, HF-LINK, HF LINK, and the HFLINK Logo are trademarks of HFpack Inc. Any external hyperlinks must only be to the main page of the HFLINK.COM website http://hflink.com . Capture of the HFLINK website or any part of it within the frame of another website is not permitted. HFLINK group forum is a private group. Public archiving, forwarding, or open display on the internet of HFLINK group forum or messages is forbidden. All text and images on the HFLINK website are property or copyright HFpack Inc, or when used by permission, are copyright by their respective owners, with all rights reserved.
HFN and High Frequency Network are service marks and trademarks of HFpack, Inc. No part of the HFLINK website or HFLINK Group Forum may be used or copied without written permission of HFpack Inc.